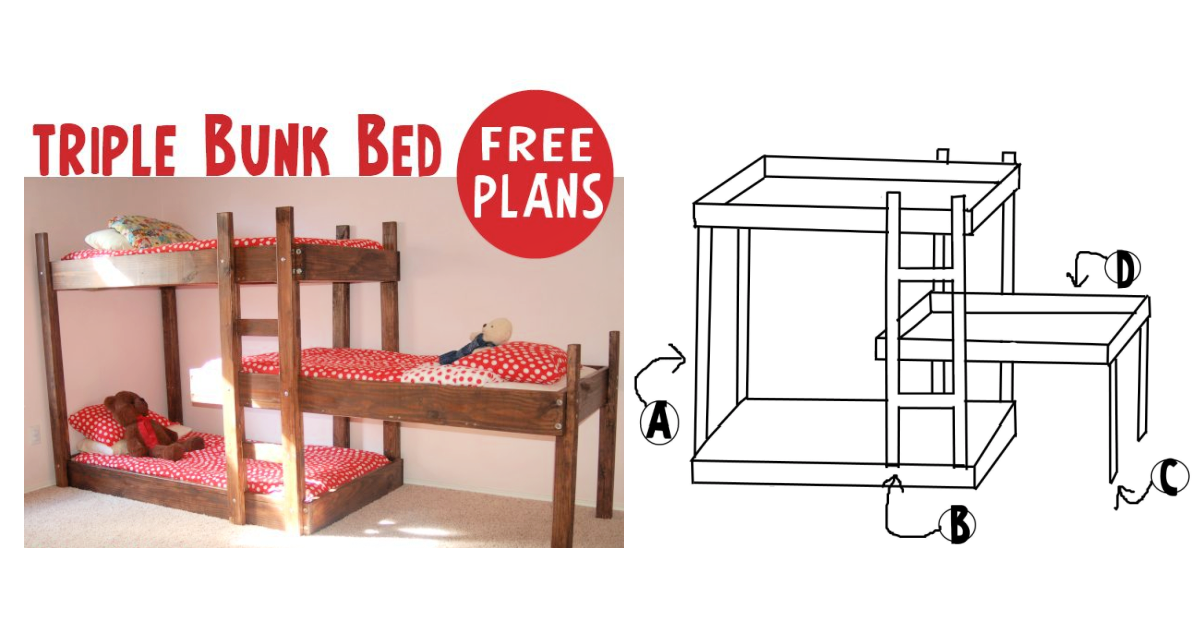
Today we have a triple bunk bed plans pdf that we used to solve a space problem in our kids room. Growing up, I remember with fondness the battles over “space” and the closeness of late night chats with my siblings as I grew up sharing a room. Now that I am a mom, I hope to give our kids the gift of comrade by through shared space. With our recent adoption, space is at a premium and we decided now is the time to create a workable space for three kids to sleep in the same space. Our solution was this triple bunk bed plan.
Triple bunk Beds for Kids Room
With 6 kids, creating a simple and affordable triple bunk bed set worked really good for our kids’ room space. Click the green button to download and print a copy of our triple bunk bed plans pdf:
Related: Awesome bunk beds for kids
How We Created This Bunk Bed Plan
We were inspired after seeing this how to build a bunk bed tutorial by Handmade Dress where they had a triple stacked bunk. While we loved the plan, it was required to be screwed into the wall which might be a problem for us with moving kids around. We wanted a more adaptable version of the triple bunk bed set, in case the kids decided to switch rooms, we have to move, or if they wanted to change the layout of the bunks.
With the help of the friendly lumber assistants at our local hardware store, we were able to create our own freestanding triple bunks.

Supplies Needed to Build a TRiple Bunk
- 18 carriage bolts and nuts.
- 2×6 boards
- 2×4 boards
- 2×3 boards
- 3 sheets of plywood – all cut to be 39 3/4″ x 75 inches.
- Box of wood screws 3″ long.
- Gel Stain
- Rub-on Polyurethane
- Table Saw
- Router*
- Drill
- Power Hand Sander – otherwise you’ll spend hours sanding!
*We were able to borrow a router, if not we would have rented one – we used it to mold the edges so they were slightly curved. It really added a polished look to the finished product. Note: We do have a circular saw, but we barely used it as the staff at our hardware store cut the wood for us which saved us work and helped us fit the pieces into our van.
Sizes to Cut the wood

2×6 Boards
- 6 boards 80″ long
- 6 boards 40″ long {These will make the bed “box”}
2×4 Boards
- 6 boards 66″ long
- 2 boards 43 3/8″ long {Those will make the uprights for the top bunk}
- 2 boards 40″ long
- 2 boards 25 inches long {These will support the middle bunk}
- 4 boards 20″ long {the steps of the ladders}
- 16 boards 7 1/4″ long {These are the supports between steps in the ladder}
2×3 Boards
- 2 boards 60″ long {Top Bunk’s guard rail}
- 15 boards roughly 40″ long {NOTE: These are the supports for the bed platforms. If your wood is slightly bowed as ours was you may need to measure these after you get your bed box created and cut to fit}
Instructions to Put together the triple Bunk Bed Set

Step 1: See Diagram “A”
- 66″ board & 1 – 43 3/8″ board: Make 2
- Put a 2×6 scrap on the bottom fot he 60″ board – do not screw it in, use only for placement.
- Screw the 43 3/8″ board over the scrap. The board will now be 4×4 except for where the beds sit
Step 2: See Diagram “B”
- 66″ boards, 2 – 20″ boards, 8 – 7 1/4″ boards: Make 2.
- Like before, use a scrap 2×6 to find where the first board starts.
- Screw a 7″ board about the 2×6 open slot so that the boards create a 4×4.
- Screw in the 20″ step, add another 7″ above it and then use the scrap 2×6 to reserve the space for the bed. Repeat until the ladder is “filled”.
Step 3: See Diagram “C”
- 40″ boards & 2 – 25″ boards. Screw them together so that the ends are notched, leaving space for the middle bunk to rest on the support.
- Make two legs.
Step 4: See Diagram “D”
- 80″ boards & 2 – 40″ boards. Make three bed boxes.
- Screw the boards together. Add cross rails for support (2×3 boards 40″ long). we used five supports per bunk.
Adding Side Rails to Your Bunk Bed
In our case, we kept the bunks without rails letting the older siblings sleep on the top bunks. If you want to add rails, create those with additional boards. Or if you want a temporary solution that can change over time, here are some bed rails you can grab with our affiliate link off of Amazon:
Download & Print Your Triple Bunk Bed Plans pdf File Here
For more details, click and you can see the PDF of “plans” that we put together.
We have happy kiddos – they love their updated bedroom sleeping in their new beds!! I love the floor space in what was before a crowded bedroom!
More Room Fun from Kids Activities Blog
Are your kids in bunk beds? What age did you move your children into bunk beds?

