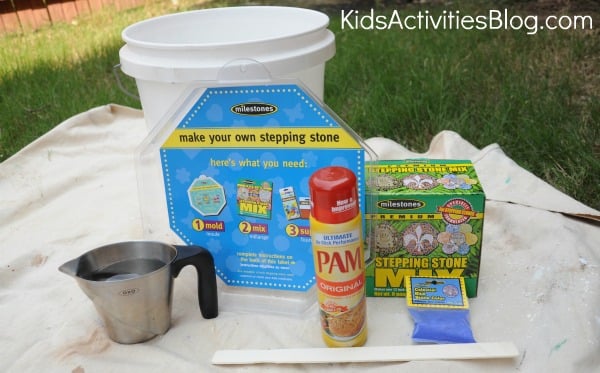
Today we are making a stepping stone for the garden to give as a gift. This simple stepping stone DIY tutorial is great to do with kids. It is easy to learn how to make a stepping stone and customize it for your backyard or garden.
DIY Stepping Stone Craft Kids Can Make
Making stepping stones is a fun homemade gift kids can make. We are making this one for Father’s Day, but almost any occasion could be celebrated with the gift of a garden stepping stone.
Related: Make these stepping stone cookies
This Father’s Day Stepping Stone is a great project for a fun handprint craft for the kids to add their own decorative elements and a long-lasting keepsake for dad to put in the garden or backyard.
This article contains affiliate links.
How to Make Stepping Stones
I was very intimidated to work with concrete. You have to get the mixture just the right consistency, and I figured I would have a goopy mess with air bubbles that was too wet to hold an imprint, or that it would harden up too quickly for the kids to finish decorating it.
But, my kids were really excited about this project so we jumped in anyway, and I am glad we did because it was a good idea.
Supplies for Making a Stepping Stone

- a mold or a disposable round aluminum pan or old cake pan can be used as stone molds
- concrete mix
- water
- vegetable oil or cooking spray
- bucket to mix the concrete in
- and something to stir with. We started with a paint stirring stick but had to upgrade to a real spoon once the mixture stiffened.
- You might also want to add some colorant to the concrete for a unique touch.
- (Optional) sea glass, small stones, flat stones, mosaic tiles, pieces of china, glass pieces, glass beads or other decorative items to make your own design
Stepping Stone Tip #1: A basic quick setting concrete mix at your local hardware or home improvement store will also work, but this stepping stone mix is just the right amount to fill the mold. It even has the correct measurements for how much water to add to get just the right texture for that size mold! See below for more stepping stone kits we like.
Stepping Stone Tip #2: It is a great idea to stop by the dollar store before starting the DIY stepping stones project to pick up treasures to add to the surface of the stepping stone as decoration.
Directions for Making a Stepping Stone
Step 1
Coat your mold with oil so that it will easily release the stepping stone once it has dried.

Step 2
Pour the concrete mix in the bucket (our stepping stone kit mix made 8 lbs. of concrete). <–Be careful of the concrete dust…you may even want a dust mask for this part.
Add water per directions & mix to the consistency of sour cream or thick cake batter.
Note: We did all these tutorial steps outside on a flat surface to decrease the mess. We did use a drop cloth (you could use plastic bags spread out) so the rocks and mosaic pieces didn’t get lost in the grass.
Step 3
Mix in colorant (optional). Blend well, then pour into mold.

Step 4
Spread out concrete in mold to get a smooth surface.
Step 5
Decorate and personalize for Dad! You can use a stick to write words or decorate the stone with small glass tiles or marbles.

Step 6
Allow to dry overnight until the concrete sets and then pop it out of the mold and get it ready to give to dad!
Our Experience Making a Father’s Day Stepping Stones (So Much Fun)!
The kids had plans for decorating their Fathers Day stepping stone before it dried.
They each started with pressing their handprint into the wet concrete.
Then, they wanted to write “Daddy Rocks” in rocks, so I added some dot letters to give them a guide for where to place the rocks.
Then, they pulled out their collection of pebbles and went to work filling in the letters.
Wet concrete is so much more forgiving than I expected. My 3 year old poked her finger deep into the wet concrete, and I didn’t even realize what she was doing until she had completely ruined two of the letters they had filled in, and she had gouged out a chunk of wet concrete.
But, it was easy to smooth the concrete back in place and fix the letters.

We added each child’s initial to their handprints and a date, and then waited for the concrete to dry and set.
It sat overnight until we had dry concrete, and then we popped it right out of the mold the next day.
We’re pretty sure Daddy will love it and plan to make a few more for our stone path in the garden area.
More Stepping Stone Kits We Love
We have found these favorite garden stones that you can make for your yard:
Prep Time
15 minutes
Active Time
15 minutes
Total Time
30 minutes
Difficulty
Hard
Estimated Cost
$10
Materials
- a mold or a disposable round aluminum pan
- concrete mix
- water
- oil or cooking spray
- (Optional) colorant
Tools
- bucket
- sturdy spoon for stirring
Instructions
- Coat the mold with cooking oil.
- Pour concrete mix into a bucket and add water per directions.
- Mix the concrete to the consistency of sour cream.
- Mix in colorant.
- Blend well and pour into mold.
- Smooth out concrete.
- Decorate and personalize adding handprints.
- Allow to dry overnight and then remove from mold.
More Father’s Day Crafts & Activities from Kids Activities Blog
How did your handprint stepping stone turn out? Did you make more than one stepping stone for your garden?

